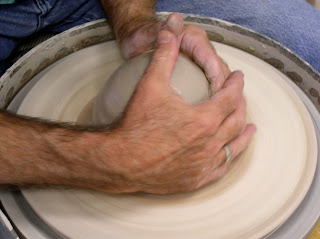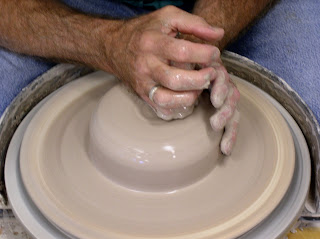
Start with a well wedged ball of clay that fits in your hand as seen (we will explain the advantages of spiral wedging later). The smallest ball would be with the fingers overlapped as shown here. The largest would be as shown above. This will fit your hand. We do not worry about how much clay you are using. Weights are not important, volume is. Matching the ball of clay to your hand and body is very important.
We will break down the process of throwing into three distinct phases:
- Centering
- Opening
- Pulling the Walls
Each phase will have two hand positions. In effect, you need only learn six hand positions, that's all- six. You can quicken the process with a bit of memorization- the six hand positions. We will clearly demonstrate them. Remember the previous post on body positioning. Then, slap the ball down on the wheel head or batt as close to the center as possible. Seal the base of the ball with the heal of the hands. Generously lubricate the clay.
Centering- It's the most important aspect in learning to throw. You can not make a pot of good design or proportion without first centering the mass of clay on the wheel. Some potters work "in the ball park" so to speak, but at some point the pot must be brought to a relatively symmetrical aspect on an axial orientation.
-First hand position: "Wrap/Rotate/Squeeze"
 |
| hands overlapped |
 |
| wrap, rotate, squeeze |
 |
| relax in place, then release- don't spring away from contact |
-Second hand position: "Cup/Karate Chop" or "centering position"
 |
| left arm should be line up directly from hip to wrist through center of cone |
 |
| push down with right, push in with left |
 |
| center the "mushroom" |
 |
| 3 to 1 proportions (width to height) |
You are almost there.
Keeping the hands in centering position, push the clay in (with left hand) at the base and let the clay rise up a bit, then push it back down to the centered proportion as shown and stated. This assures that the entire piece of clay is centered, that is, the base or "skirt" (shown) is centered as well. The skirt should be a smooth curved transition to the batt, the result of the left hand heal contact when hands are in the centering position. Repeat this "up and down" until the clay is (re)centered (3 to 1 proportions) and the skirt is set- the skirt is the first contact point for pulling the walls. Everything you do now sets up what you are going to do later!!!
 |
| skirt |
 |
| up |
 |
| down |
 |
| centered! |


No comments:
Post a Comment