Friday, September 24, 2010

Throwing 101- Centering


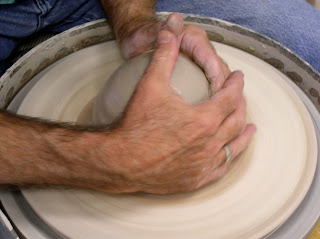
Start with a well wedged ball of clay that fits in your hand as seen (we will explain the advantages of spiral wedging later). The smallest ball would be with the fingers overlapped as shown here. The largest would be as shown above. This will fit your hand. We do not worry about how much clay you are using. Weights are not important, volume is. Matching the ball of clay to your hand and body is very important. 


We will break down the process of throwing into three distinct phases:
- Centering
- Opening
- Pulling the Walls

 Each phase will have two hand positions. In effect, you need only learn six hand positions, that's all- six.  You can quicken the process with a bit of memorization- the six hand positions. We will clearly demonstrate them. Remember the previous post on body positioningThen, slap the ball down on the wheel head or batt as close to the center as possible. Seal the base of the ball with the heal of the hands. Generously lubricate the clay.


Centering- It's the most important aspect in learning to throw. You can not make a pot of good design or proportion without first centering the mass of clay on the wheel. Some potters work "in the ball park" so to speak, but at some point the pot must be brought to a relatively symmetrical aspect on an axial orientation.

-First hand position:  "Wrap/Rotate/Squeeze"

hands overlapped
wrap, rotate, squeeze
Wrap your hands around the ball of clay so as to overlap the fingers, right hand fingers over left. Rotate the hands counter clockwise so that the left elbow tucks into the left hip (as close as possible). Squeeze the clay at the base of the ball using the heal of the hands (inner fleshy part of palms under the pinky). Let the clay move upward as a result of the squeezing.  Keep full hand contact.  But you should not be using the fingers to squeeze.

relax in place, then release- don't spring away from contact
Repeat this, base to top, three to five times or more to get a thick conical shape. Keep the left elbow tucked into the hip. This will keep the cone shape on axis or at least close.


-Second hand position:  "Cup/Karate Chop" or "centering position"

left arm should be line  up directly from hip to wrist
through center of cone 
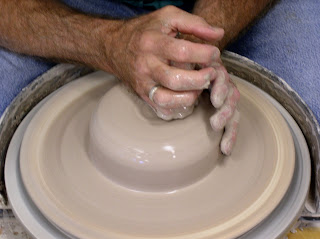
Place the left hand on upper part of cone, "cupping" the upper portion as seen (to cup, the thumb must be on top of the cone). The left elbow should remain tucked close to the hip! Place the right hand over the cone as if to give it a karate chop down the middle. The hands should be in good contact, left thumb under the right hand. Push down with the right hand; push in with the left hand. The top of the cone will flare slightly to a shape something like a mushroom. Center the "mushroom" or flared top immediately. Relax and release. Then repeat, taking the mushroom down a bit further each time. Lubricate, work, relax and release. Continue until the clay is pushed down to a proportion of 3 to 1- the width being three times the height.

push down with right, push in with left 


center the "mushroom"


3 to 1 proportions (width to height)

You are almost there.

Keeping the hands in centering position, push the clay in (with left hand) at the base and let the clay rise up a bit, then push it back down to the centered proportion as shown and stated. This assures that the entire piece of clay is centered, that is, the base or "skirt" (shown) is centered as well. The skirt should be a smooth curved transition to the batt, the result of the left hand heal contact when hands are in the centering position.  Repeat this "up and down" until the clay is (re)centered (3 to 1 proportions) and the skirt is set- the skirt is the first contact point for pulling the walls.  Everything you do now sets up what you are going to do later!!!
skirt

up
down
centered!

Wednesday, September 8, 2010

Throwing 101

Before getting down to the mechanics of throwing, we need to make a few important points.

Making pottery is a skill, a craft.  Like learning to play an instrument, it take many hours of practice and patience. And more practice. Here at PrattMWP, with both college and continuing learners, practice time will vary greatly as one group of students is taking the class for credit, the other is more recreational. In either case, quality practice or "wheel time" is important.

Everyone learns at a different pace. Just keep practicing. A note book is absolutely necessary. There is too much information to absorb at once. The note book is your reference when the instructor is not nearby. We will break the process down into a clear, concise set of hand positions.  Some simple memorization will help immensely.

Finally, have fun. There are many challenges but there is always something new to learn. What better way to spent your time!

Over the next few post we will demonstrate the craft of throwing of a standard cylinder.  To start, we need to explain some important concepts-

1. You throw with your entire body.  Your hands are the most obvious part of the mechanics of throwing, but- You throw from the hips and with your legs.  

legs up, shoulders down, nose down
Your hips are your base. They don't move while you work. Place your bottom on the stool or seat away from the wheel so when bending forward your nose is over the center of the wheel. 

elbows on legs, close to hips
Your legs are a source of strength. Place you right leg on the pedal (best for throwing with the wheel turning counter clockwise) or stirrups so the knee is slightly above the splash pan. Use a brick or two to prop up the left leg so it is the same height as the leg on the pedal. Like Susan Sommers' "thigh master" commercial of years ago, squeeze the splash plan. This will get your legs involved, making a strong connection to the hips. As you bend over the wheel, place your elbows on your thighs as close to the hips as comfortable. This is the best position for throwing.  It is not great for the back, true. We will talk about that in another post.

So- hips, legs, and hands. Keep you elbows on your legs close to the hips and your nose down.  Finally, relax the shoulders!  You should work from strength and technique, not tension.  

2. Learn and develop a rhythm while throwing.  I like to use a simple mantra to keep students on track:  "Lubricate/work/relax and release- lubricate/work/relax and release." Say it over a few times and you get a nice sing-song lilt that sticks with you. This will slow you down and remind you of some important details that will make your effort easier and successful. We will talk more about this as we go on. Photos to follow...

Saturday, September 4, 2010

Making pots: first, a note on the politics of media...

Anyone new to throwing faces real challenges, an understatement to be sure. But a little appreciated aspect of pottery, or working with clay in general, is the initial and core relationship the ceramic artist or potter confronts with the material. Unlike most other three dimensional media, clay has no formal structure in the conventional sense.  Potters and ceramic sculptors enjoy a greater array of possibilities, but also require much more than a cursory knowledge of our materials to produce a final work- let alone a good one.

All of the traditional and newer materials- metal, wood, plastics, rubber, stone, or found objects come with space filling and defining mass that holds itself together without and before external assistance (we'll skip "performance" work that sculptors somehow deemed themselves qualified to execute the last few decades- a curious conceit that requires a great deal of patience to talk about). When manipulating any of these materials, the maker starts with a structural surety that is then altered to the aesthetic need of the artist. With some exceptions the forming material itself is seldom "created." (Unless the artist is making his or her own steel from molten iron and coke!  Indeed, I loved the Friday night "pours" of bronze or aluminum while in grad school at Syracuse University.  And I remember spending more time in the glass blowing studio at Penland, one summer long ago, than in the clay shop! Glass blowers rock.)

I make this point to argue against the time honored and worn out hierarchy of artistic media (and with it, the art market) that dominates the art world. All three dimensional work requires a degree of skill (most often by the artist- this is another issue for a later time) to manipulate the material into some form and shape, or arrangement, true enough. But, clay simply exists in a form of mass only, with no clear direction or dimension. How is it that this trait leads to its lowly place, residing in the lower tiers of relevance and respect in the western art world (US)?  Relatively few galleries can be found with clay artists an important part of the stable.  It is not precious, being found literally everywhere, and the process is little understood by those looking at it.  It is not pristine, thank god.  It is only the stuff of life- in reality, not just as metaphor. So it is the most common of materials, yet requires the most uncommon mastery to achieve truly timeless results. Such is life.

Making works from clay requires the simultaneous creation of structure, form and shape, and surface, especially making pots, to which you may add the acquired knowledge of functional design. As mentioned above, some media, techniques in metalsmithing come to mind, perform the same magic.  Luckily, the jeweler, being in the much more marketable realm of fashion, enjoys greater popularity, a reflection of our cultural leanings.  Clay works are certainly enjoying a popularity like never before.  But, unlike a culture educated in and by the crafts in general, like Japan, handmade pots in our culture are not universally received into the home. This seems the case regardless of the very successful move toward fashion seen in much contemporary (American baroque?) work. Surface design manipulation is stronger than ever. But I think William Morris would be rolling in his grave. 

A word of caution is needed. Fashion is just that. I like the ornamentation and decoration (confession: I wish I was better at it). Even in Japan highly decorated works easily coexist with the understated, thanks mainly to the local geopolitical dominance Japan once enjoyed. In our culture (and others to be fair),  fashion (and sparkle) generally trumps utility and/or "risk taking," the core exercise of mentally reworking visual equations, that was drilled into our heads in art school. And, too often, sadly, fashion trumps art (to rework a favorite phrase from a colleague). As long as we understand the difference, all is forgiven. Commerce is a tough ruler, though.

It is naive to think the hierarchy will ever change. And, as mentioned above, there are certainly other factors in play.  And many of my points can be added to or challenged (happily received!) But it is useful to know that our craft is indeed special. Much like the writer and the musician, we make something from nothing. Quite the feat!

A note is needed on media of another sort- the internet. As I have said many times in class, beware of what you see on the internet. "You Tube" is great but it seems anyone with an introductory course (or two?) under their belt thinks they have something to teach. This is endearing but many new potters should wait awhile before getting into the sharing mode. So many tired old wives tales are past along with no critical reflection. Teaching is an art form in itself and nothing makes the teacher better than experience, offline please.

Finally, magazines are a very good source of images and information.  Here, too, a little discretion is helpful.  As I learned early in my career, color (blue) sells.  Editors want to sell magazines.  Sometimes the visual flash of an image masks the quality (or lack therein) of the work.  Anyone can now take quality images of their work and submit them for publication.  But the work should be more than eye candy and slide craft.

I like the current movement to bring critical review to ceramics, but worry that it will just descend into the same lame push toward the "new" and the different which has resulted in so much bad work being done in the name of "Art." Just more politics with the reviewers holding sway.

So as you begin, note that nothing takes the place of an experienced teacher- still.  Find teachers you trust.  They will know what artists are worth looking at.  Taking classes at an art school, my students come to know that we are teaching more than the mechanics of throwing.  We want to meld craftsmanship with design, broad and deep bodies of knowledge, rich in history, loaded with excellent references to give you and your work context.  Is it "art?"  Time will tell.  It is the process and the connections that are important.  For now the goal is learning to throw.  Then comes the important part- making pots. Enjoy the experience...