Saturday, December 18, 2010

End of Semester

Grades are in.  This has been a very busy semester in so many ways. Though I risk with this post sounding like one of those xeroxed Christmas card/letters we all love (so much) to get, there are a few things we want to convey to all who follow us.

We officially opened and dedicated the Vincent R. Clemente Ceramic Resource Room in October. It is a significant addition to the department. We are grateful and indebted to Vincent and Mary for their generosity to the ceramics department here at MWP. The packed house event was a highlight of the semester. Special thanks to all who helped pull the very comfortable and information packed room together.

One important person, however, was not with us. We lost Mary this year after a stoic yet considerable effort to regain her health. Her outlook and a never ending positive attitude taught us something about facing the inevitable in life with dignity and courage, not to mention a sense of humor to the very end.  She is missed. Vincent continues to be an important part of our department giving demonstrations and helping with salt and wood firings (not to mention the jibes and funny stories).

The recruiting trail was especially satisfying and pleasantly tiring. Trips to the Cape, Poughkeepsie, and Toronto were on the docket. I enjoyed meeting all who were interested in attending PrattMWP. Some excellent work and, as always, very interesting students prove to me that the arts will continue to thrive. We hope you begin your training here!
William Daley

Each host city for the reviews was memorable for the local art scene. The Cape Cod Museum in Dennis is gem. Can't wait to go back. The Mill Street Loft in Poughkeepsie provides an incredible art experience for local high school students with an obviously dedicated (and in my case, caring- thanks again, Gabrielle) staff. I am a new fan. Finally, Toronto is an experience like no other. The AGO, ROM, and the Gardiner make this world class city a must visit on a regular basis. We missed the Terra Cotta Warriors at the ROM but hope to make a trip to Montreal in February for the exhibition.

Janelle was honored with a teaching award from a local civic group for her work with the visually impaired. She also put in a strenuous but very successful semester mounting three alumni shows in the school of art gallery.

The continuing education students are making outstanding work. In response, we are planning an exciting addition to the ceramics department this spring- the "Hallway Gallery" will open in February. Upstairs in the ceramics building, next to the Clemente Resource Room, the gallery will provide much needed local exhibition space for ceramic works by the students of MWPAI and PrattMWP. We plan to have 4 or 5 group shows a year with the remainder of the time exhibiting the permanent collection of work from the sophomore classes. We will keep you posted on openings and events.

Throwing Day for Empty Bowls is in February with the event planned for early April. This year we will be staging the event on campus. We will also be reaching out to a larger number of organizations who provide help to those in need. We are very excited about the changes.

Porcelain, Philadelphia NCECA
The fall anagama firing was postponed (too busy to fire the wood kiln- what is that???) and will be fired this spring. The wood is in and the weather will determine the dates. The continuing education students have loaded a salt and will be firing this Monday. The semester never ends!!!

Taylor Edwards, Sophomore, Ceramic Sculpture Class, 2010
It has been a kick of a semester- good creac, as they say in Ireland. Lots of laughs, some difficult times for some in the "family" but lots of good pots being made. Let's do it again. Form is king and power to the people!

Friday, September 24, 2010

Throwing 101- Centering


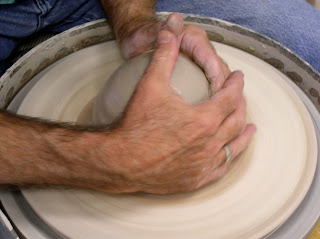
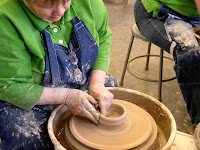
Start with a well wedged ball of clay that fits in your hand as seen (we will explain the advantages of spiral wedging later). The smallest ball would be with the fingers overlapped as shown here. The largest would be as shown above. This will fit your hand. We do not worry about how much clay you are using. Weights are not important, volume is. Matching the ball of clay to your hand and body is very important. 


We will break down the process of throwing into three distinct phases:
- Centering
- Opening
- Pulling the Walls

 Each phase will have two hand positions. In effect, you need only learn six hand positions, that's all- six.  You can quicken the process with a bit of memorization- the six hand positions. We will clearly demonstrate them. Remember the previous post on body positioningThen, slap the ball down on the wheel head or batt as close to the center as possible. Seal the base of the ball with the heal of the hands. Generously lubricate the clay.


Centering- It's the most important aspect in learning to throw. You can not make a pot of good design or proportion without first centering the mass of clay on the wheel. Some potters work "in the ball park" so to speak, but at some point the pot must be brought to a relatively symmetrical aspect on an axial orientation.

-First hand position:  "Wrap/Rotate/Squeeze"

hands overlapped
wrap, rotate, squeeze
Wrap your hands around the ball of clay so as to overlap the fingers, right hand fingers over left. Rotate the hands counter clockwise so that the left elbow tucks into the left hip (as close as possible). Squeeze the clay at the base of the ball using the heal of the hands (inner fleshy part of palms under the pinky). Let the clay move upward as a result of the squeezing.  Keep full hand contact.  But you should not be using the fingers to squeeze.

relax in place, then release- don't spring away from contact
Repeat this, base to top, three to five times or more to get a thick conical shape. Keep the left elbow tucked into the hip. This will keep the cone shape on axis or at least close.


-Second hand position:  "Cup/Karate Chop" or "centering position"

left arm should be line  up directly from hip to wrist
through center of cone 
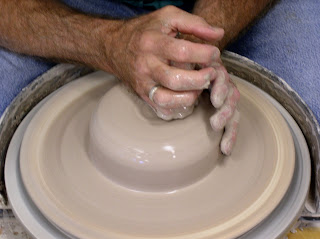
Place the left hand on upper part of cone, "cupping" the upper portion as seen (to cup, the thumb must be on top of the cone). The left elbow should remain tucked close to the hip! Place the right hand over the cone as if to give it a karate chop down the middle. The hands should be in good contact, left thumb under the right hand. Push down with the right hand; push in with the left hand. The top of the cone will flare slightly to a shape something like a mushroom. Center the "mushroom" or flared top immediately. Relax and release. Then repeat, taking the mushroom down a bit further each time. Lubricate, work, relax and release. Continue until the clay is pushed down to a proportion of 3 to 1- the width being three times the height.

push down with right, push in with left 


center the "mushroom"


3 to 1 proportions (width to height)

You are almost there.

Keeping the hands in centering position, push the clay in (with left hand) at the base and let the clay rise up a bit, then push it back down to the centered proportion as shown and stated. This assures that the entire piece of clay is centered, that is, the base or "skirt" (shown) is centered as well. The skirt should be a smooth curved transition to the batt, the result of the left hand heal contact when hands are in the centering position.  Repeat this "up and down" until the clay is (re)centered (3 to 1 proportions) and the skirt is set- the skirt is the first contact point for pulling the walls.  Everything you do now sets up what you are going to do later!!!
skirt

up
down
centered!

Wednesday, September 8, 2010

Throwing 101

Before getting down to the mechanics of throwing, we need to make a few important points.

Making pottery is a skill, a craft.  Like learning to play an instrument, it take many hours of practice and patience. And more practice. Here at PrattMWP, with both college and continuing learners, practice time will vary greatly as one group of students is taking the class for credit, the other is more recreational. In either case, quality practice or "wheel time" is important.

Everyone learns at a different pace. Just keep practicing. A note book is absolutely necessary. There is too much information to absorb at once. The note book is your reference when the instructor is not nearby. We will break the process down into a clear, concise set of hand positions.  Some simple memorization will help immensely.

Finally, have fun. There are many challenges but there is always something new to learn. What better way to spent your time!

Over the next few post we will demonstrate the craft of throwing of a standard cylinder.  To start, we need to explain some important concepts-

1. You throw with your entire body.  Your hands are the most obvious part of the mechanics of throwing, but- You throw from the hips and with your legs.  

legs up, shoulders down, nose down
Your hips are your base. They don't move while you work. Place your bottom on the stool or seat away from the wheel so when bending forward your nose is over the center of the wheel. 

elbows on legs, close to hips
Your legs are a source of strength. Place you right leg on the pedal (best for throwing with the wheel turning counter clockwise) or stirrups so the knee is slightly above the splash pan. Use a brick or two to prop up the left leg so it is the same height as the leg on the pedal. Like Susan Sommers' "thigh master" commercial of years ago, squeeze the splash plan. This will get your legs involved, making a strong connection to the hips. As you bend over the wheel, place your elbows on your thighs as close to the hips as comfortable. This is the best position for throwing.  It is not great for the back, true. We will talk about that in another post.

So- hips, legs, and hands. Keep you elbows on your legs close to the hips and your nose down.  Finally, relax the shoulders!  You should work from strength and technique, not tension.  

2. Learn and develop a rhythm while throwing.  I like to use a simple mantra to keep students on track:  "Lubricate/work/relax and release- lubricate/work/relax and release." Say it over a few times and you get a nice sing-song lilt that sticks with you. This will slow you down and remind you of some important details that will make your effort easier and successful. We will talk more about this as we go on. Photos to follow...

Saturday, September 4, 2010

Making pots: first, a note on the politics of media...

Anyone new to throwing faces real challenges, an understatement to be sure. But a little appreciated aspect of pottery, or working with clay in general, is the initial and core relationship the ceramic artist or potter confronts with the material. Unlike most other three dimensional media, clay has no formal structure in the conventional sense.  Potters and ceramic sculptors enjoy a greater array of possibilities, but also require much more than a cursory knowledge of our materials to produce a final work- let alone a good one.

All of the traditional and newer materials- metal, wood, plastics, rubber, stone, or found objects come with space filling and defining mass that holds itself together without and before external assistance (we'll skip "performance" work that sculptors somehow deemed themselves qualified to execute the last few decades- a curious conceit that requires a great deal of patience to talk about). When manipulating any of these materials, the maker starts with a structural surety that is then altered to the aesthetic need of the artist. With some exceptions the forming material itself is seldom "created." (Unless the artist is making his or her own steel from molten iron and coke!  Indeed, I loved the Friday night "pours" of bronze or aluminum while in grad school at Syracuse University.  And I remember spending more time in the glass blowing studio at Penland, one summer long ago, than in the clay shop! Glass blowers rock.)

I make this point to argue against the time honored and worn out hierarchy of artistic media (and with it, the art market) that dominates the art world. All three dimensional work requires a degree of skill (most often by the artist- this is another issue for a later time) to manipulate the material into some form and shape, or arrangement, true enough. But, clay simply exists in a form of mass only, with no clear direction or dimension. How is it that this trait leads to its lowly place, residing in the lower tiers of relevance and respect in the western art world (US)?  Relatively few galleries can be found with clay artists an important part of the stable.  It is not precious, being found literally everywhere, and the process is little understood by those looking at it.  It is not pristine, thank god.  It is only the stuff of life- in reality, not just as metaphor. So it is the most common of materials, yet requires the most uncommon mastery to achieve truly timeless results. Such is life.

Making works from clay requires the simultaneous creation of structure, form and shape, and surface, especially making pots, to which you may add the acquired knowledge of functional design. As mentioned above, some media, techniques in metalsmithing come to mind, perform the same magic.  Luckily, the jeweler, being in the much more marketable realm of fashion, enjoys greater popularity, a reflection of our cultural leanings.  Clay works are certainly enjoying a popularity like never before.  But, unlike a culture educated in and by the crafts in general, like Japan, handmade pots in our culture are not universally received into the home. This seems the case regardless of the very successful move toward fashion seen in much contemporary (American baroque?) work. Surface design manipulation is stronger than ever. But I think William Morris would be rolling in his grave. 

A word of caution is needed. Fashion is just that. I like the ornamentation and decoration (confession: I wish I was better at it). Even in Japan highly decorated works easily coexist with the understated, thanks mainly to the local geopolitical dominance Japan once enjoyed. In our culture (and others to be fair),  fashion (and sparkle) generally trumps utility and/or "risk taking," the core exercise of mentally reworking visual equations, that was drilled into our heads in art school. And, too often, sadly, fashion trumps art (to rework a favorite phrase from a colleague). As long as we understand the difference, all is forgiven. Commerce is a tough ruler, though.

It is naive to think the hierarchy will ever change. And, as mentioned above, there are certainly other factors in play.  And many of my points can be added to or challenged (happily received!) But it is useful to know that our craft is indeed special. Much like the writer and the musician, we make something from nothing. Quite the feat!

A note is needed on media of another sort- the internet. As I have said many times in class, beware of what you see on the internet. "You Tube" is great but it seems anyone with an introductory course (or two?) under their belt thinks they have something to teach. This is endearing but many new potters should wait awhile before getting into the sharing mode. So many tired old wives tales are past along with no critical reflection. Teaching is an art form in itself and nothing makes the teacher better than experience, offline please.

Finally, magazines are a very good source of images and information.  Here, too, a little discretion is helpful.  As I learned early in my career, color (blue) sells.  Editors want to sell magazines.  Sometimes the visual flash of an image masks the quality (or lack therein) of the work.  Anyone can now take quality images of their work and submit them for publication.  But the work should be more than eye candy and slide craft.

I like the current movement to bring critical review to ceramics, but worry that it will just descend into the same lame push toward the "new" and the different which has resulted in so much bad work being done in the name of "Art." Just more politics with the reviewers holding sway.

So as you begin, note that nothing takes the place of an experienced teacher- still.  Find teachers you trust.  They will know what artists are worth looking at.  Taking classes at an art school, my students come to know that we are teaching more than the mechanics of throwing.  We want to meld craftsmanship with design, broad and deep bodies of knowledge, rich in history, loaded with excellent references to give you and your work context.  Is it "art?"  Time will tell.  It is the process and the connections that are important.  For now the goal is learning to throw.  Then comes the important part- making pots. Enjoy the experience...

Saturday, August 21, 2010

Welcome back!

 
From Philadelphia Conference

Welcome back all students.  

We are looking forward to meeting the sophomore throwing class and renewing the fun times and great works being done in the community education courses.

We will be doing some interesting things this semester.  We plan to rebuild the arch of the salt kiln with hard refractory.  We will talk more on that in a later post.  We will also be moving the raku kiln to the new location (what was the wood-lot next to the kiln shed).

We have added a glaze bench and will be reorganizing the test tiles with our regular glazes and some new versions as well (that's the plan!).

In addition, we plan to dedicate the Vincent R. Clemente Ceramic Resource Room sometime in October.   We will be scheduling the fall wood firing and salt firings very soon.

I will be posting information for all students during the semester. Hope it is helpful.

From Conference
Good to be back!

Sunday, February 14, 2010

Meso and Native American

To continue our posts on important historical references of great traditional hand building cultures for research we can group the americas as one- Meso and South American work and our own Native American pottery.  These works have many elements in common.  Pots were made for everyday use.  Pottery also played a very important part in the social and spiritual elements of life.  Two good books to begin with are "World Ceramics," by Hugo and Marjorie Munsterberg, and "A History of World Pottery," by Emmanuel Cooper.  These books can be found in the school library.


Native American work from the Pueblo era in the southwest are still made in the same traditional way.  The most famous of the Pueblo potters was Maria Martinez.

Sunday, February 7, 2010

Empty Bowls


Yesterday was throwing day for our third "Empty Bowls."  We began this annual fund raising event in 2008, thanks to Janelle's hard work and dedication.  Empty bowls is a nationally supported, but locally organized effort by potters of many communities to help those who may not have the means for a sustaining daily meal.  We continue to work to benefit and support the terrific people at Hope House.

Hats off to all of our continuing education students for once again giving their time and effort, making so many pots.  Our community of potters is the best.  A long day of throwing with lots of laughs and pots to (trim!) fill.  More on the event will follow.

Friday, February 5, 2010

Iranian Ceramics

An excellent book on early Iranian ceramics is authored by Trudy S. Kawami.  "Ancient Iranian Ceramics" documents works from the Sackler Collections. I will bring my copy to our next class. For those of you wanting to add handles or spouts, these pieces may be a good start for design.

The Jomon book is now on reserve at the school library.

Monday, February 1, 2010

Variations in Salt Firing

The use of salt to glaze pots began in Germany during the 1500's.  It is not known exactly how the idea came about.  Stories of cod crates or maybe a smart chemist who made pots on the side are common.  I don't know of any written accounts marking the first use of salt for glaze.  But the expert on this is Jack Troy.  His book on salt is still the best.  Many of us started out with his book in hand as we began to revive this firing technique. There are a number of other good books on the subject.  I will list them in the next post on salt.  


Traditional salt glazing is still one of the great high fire experiences.  So simple and direct.  There are many ways to manipulate the effects at ∆10. Reduction, use of slips and washes, saggars and flashing are just a few of the basic approaches.  


But an area that is not so commonly talked about is mid temperature salt or vapor firings.  We do them here at PrattMWP in the sophomore classes.  Sometimes we use terra cotta.  This semester we will be using the ∆10 salt body I like from Sheffield Pottery,T-3S.  I have used it at ∆ 3-6 will great results.  We will get into more detail in a later post.  Just a teaser for now.


Monday, January 25, 2010

Jomon


Where better to begin than the Jomon Culture in Japan, starting around 10,000 BC.  The info on the web is extensive.   One of the best books on Jomon is by Douglas Moore Kendrick.  The school library doesn't have a copy, but I will make mine available up stairs in the Ceramic Resource Room.

A chronology of early to late forms can be found on page 20 of Kendrick's book.  These simple drawings show the development of style during this period.  I am often struck by the similar stylistic arch or maturity seen in cultures. This is often seen in individual artists as well.  From the early, relatively quiet emphasis on form and shape to more ornate and elaborate visual elements.  The emphasis on the rim in the later Jomon periods make the point we made in class this week.  "Definition,"  the treatment of the foot and the rim sets up everything else in the pot.  Think of it compositionally as framing the piece.  All good works have this.  We will talk more about this next week.  For your research this week, look at pots for this aspect.  How strong are the defining elements of the work you are looking at?

Draw as many different shapes as possible.  The rim treatment will be key. Draw. I want to see sketches.  They will be our first references for discussion of your work.

Review from class...
∆ Strong slab for base, thicker base coil; good pressure weld here;


∆ When coiling the wall, overlap the new coil, at least halfway, to the inside of the last coil, roll and pinch. Make a good pressure weld; work on the wall "away" from you, that is, the thumb should be on the inside of the wall when pressing;  try mastering the coil making technique I showed you;  


∆ Build up the form coil by coil;  erase with a rib the coil rings as soon as possible;  this allows you to better see the form and shape as it develops, making corrections easier;


∆ Adjust the form as you go;  compress the wall with two hand as shown in class to bring wall into the shape,  push the form out for same;  keep the shape "fair" as possible, much like a boat builder works the hull;  Stand back from the piece to see the shape developing;  


FORM IS IN YOUR HEAD FROM THE START.  THE SHAPE IS THE LINE OF THE FORM FROM ANY GIVEN SIDE.  SHAPE VARIATIONS RESULT FROM THE PROCESS OF FORMING THE PIECE AND ARE A WELCOMED PART OF THE PROCESS.  


∆ Break the plane to visually lift the form from the surface it sits on;


∆ Treat the rim- do something with it that works with the form (or in some cases counters the form, creating tension, like Jomon!).  The rim is where the viewer's eye goes first.  


The form is the single most important aspect of any piece.  All other visual elements pale by comparison.  Work on "seeing" good form.


Let other works influence yours.  It is how you learn.  Your work will be unique automatically, and your collective influences will always be different from any other's.  Use what you find in art history that speaks to you.  
Google Jomon ceramics,  the images are wonderful...

We will begin to look at surface treatments next class.  Impression, applique, marking, stamping...  Enjoy looking at pots this week. Work on technique and control!!

Sunday, January 17, 2010

To Sophomore Class Sp '10


Hello!

Our first class will meet Tuesday Jan.25.  We will begin with a demo at 9:10 am sharp.  Please have your tools and a sketch book with you for the first class.

The first class project will cover coil construction- we will start with vessel making and the elements of form and shape.  

We will talk about surface, line, edge, balance, transitions, et. al. and eye movement.

Function will be limited to jars and vases.  Handles and appendages will be possible.

Keep the forms simple and strong.  We will explore the use of drawing on these vessels.  The figure, abstract mark making, pattern and motif. 


We will explore color in a later project.


I would like to do a sculptural project second.  Be thinking about what type of forms could be made with coils.  At this point I am leaning toward work that will be presented as a group.  Two or more pieces related in some way.

The vessel work will emphasize technique and craftsmanship.  Simple forms.  Look at works from early Asian periods like Momoyama in Japan,  Yayoi in Korea, Ming in China to start.  Pre-Columbian works, African works, Greek and Mesopotamian.  Start looking- bring the forms and shapes that appeal to you to your work!

You will be learning the technique of coiling that I learned from Bruno LaVerdiere.  It will probably be different from what you have done before.  Look him up.  He can be found in a book about Penland School of Crafts in N.C.  I will demonstrate in class on Tuesday.

You will be expected to bring ideas and results of library research to class in the form of sketches and notations.  Artists do not work in a vacuum!  As sophomores, I will expect you to begin to bring purpose and meaning to your work.  This doesn't mean heavy philosophical notions.  The use of basic formal elements can convey meaning every bit as much as words and images.  Just the act of making has meaning.  

I hope to teach you various firing techniques, including modified pit/raku, and low temperature vapor/salt.  


The second series of projects will be sculptural using multiple units.  More on that at midterm.

Looking forward to meeting you all and to a productive semester!


Friday, January 15, 2010

Firing the PrattMWP salt kiln

Salting and cooling-

At ∆8 we begin to salt the kiln.  We continue until we have reached ∆9 or 10.  Some potters adjust the damper during salting. We keep the damper setting still.  We can discuss other options later.

We use a salt mixture of 2 parts salt, 1 part sawdust, 1 part fine ash. There are many recipes.  We play with this recipe from time to time. We do not use sodium bicarbonate or similar materials.  On occasion we throw in some borax, but I like the addition of ash better.  It is light and more likely to carry through the kiln with the vapor than other material.  The sawdust adds reduction material and ash.

The mix is scooped into a length of angle iron that will fit through the salting port, the opening of which is the size of a soap (a straight brick cut in half length wise).  Slide the angle iron into the kiln and turn.  You will develop a rhythm or schedule for the saltings- two troughs each side, every 8 minutes, for instance.  Continue until you have a good glaze buildup and/or reach ∆9/10.

After a salting or two, pull a test ring to gauge the glaze buildup.  We use a rod (rebar) to hook the ring from inside the kiln.  Drop the ring into a bucket of water.  When cool dry it off and check the glaze.
As the kiln ages and "seasons," it will require less salt to get the glaze buildup.  I have read some different notions about this, but I find it to be so.

After we have reached the temperature and glaze desired, we shut the kiln down.  Turn off all burners.  What you do now will have an impact on the glazes.  We "crash cool," or open all ports and damper to get the kiln to cool down quickly.  The idea is to get the glazes to "freeze," resulting in a higher gloss.  You can play with this to see what effects you can get.  If you do crash cool, drop to 2150˚F or so. Do not go below 1950˚!  The chamber should look bright orange at its coolest.  This will take a shorter time than you think.  After cooling, seal the kiln tightly, closing all ports and damper.  Then, patience. Open the kiln when you can comfortably place your hand in the upper part of the chamber.  Wait a good 24 to 36 hours to do this!  There is a common rule of thumb for heating and cooling.  Take as much time to cool as you took to fire.  We fire rather fast so we keep to the 24-36 hour rule.  More exactly, after 24 hours, we open the damper and spy ports and wait another 10 -12 hours.  The results are worth the wait!!!

Next post about salt firing- some alternate approaches using salt.

Wednesday, January 13, 2010

Firing the PrattMWP salt kiln

Ramp and Reduction-


After a bite and coffee it is time to get back to work.  But first a word of caution-  the early stage of the firing is the most dangerous for two reasons-  your safety and the pots and kiln remaining intact.


First, the pots- the initial heat up is when clay is most vulnerable. Moisture is the main concern.  As mentioned before, we fire bisque ware to reduce our worries in the early part of the firing.  This lessens the chance of steam building up in the pots and causing blowouts.  If you have green-ware or freshly glazed pots in the kiln, the front end of the schedule should be slow.  A note- if you do fire green-ware, which is a good idea for fuel savings, the culprit behind blowouts is not air pockets, but firing too fast.  You could fire clay with more pockets than swiss cheese and be fine if the schedule is slow enough.  It is steam that you want to avoid.  Steam is pressure. It is created by firing too fast.


Second, safety- the early part of the firing, when the chamber is dark, is the most dangerous.  If a burner blows out, unburned gas will pour into the kiln until something, most likely another burner, ignites it, often violently.  I have a few stories of such events.  All had good endings, just pottery or kiln damage.  Do not walk away from a kiln early in the firing!  Be there to monitor the burners.  When the kiln chamber reaches red/orange heat you can relax a bit.  Then, if a burner blows out, the heat from the chamber or firebox will ignite the burner.  Don't count on it though.  Be there!  Some other time we can talk about safety burners with baso valves and pilots, et. al.- good options, but they can be dangerous as well. Nothing is better than being near the kiln during a firing.


Ramping or turning up the kiln is mostly a matter of increasing the gas and air.  Keep the flame a nice lazy blue as you increase the fuel.  Turn the fuel up first, then add air to get the flame right.  Do this in stages. We turn the opposite corner burners up at the same time. How much depends on the strength of the burners. Aim for a schedule that will give you red heat in four to six hours, again assuming the ware is bisqued.


Oxidation and reduction might be explained as "clean" and "dirty." Oxidation is complete combustion of the fuel- plenty or air- leading to a clean blue flame. Reduction is incomplete combustion- not enough air- leading to a "dirty" yellow flame.


The damper is a key element in ramping and controlling the atmosphere.  Our damper is in the stack, about rib high.  Some designs have the damper in the horizontal flue between the kiln and the stack.  I prefer placing it in the stack.  It is easy to access and view.  The damper plate, made of a strong refractory material, usually a kiln shelf, controls the amount of hot gases exiting the kiln. The stack creates draw.  The damper plate controls the amount of draw. In doing so, it effects the amount of air mixing with the fuel in the burners.  Draft or draw pulls the flame from the burner through the kiln.


Our kilns are a natural draft design- the stack and damper control the pull of hot gases through the kiln.  Some kilns are force air or forced draft.  These have a blower attached to the burner which pushes the air/gas mix into and through the kiln.  Updraft kiln designs are usually forced air with no stack but still require a damper.


When firing, you open the damper to create more pull or draw; close it to decrease draw.  The damper works in tandem with the burners controlling heat gain.  Importantly, it also effects the atmosphere of the kiln.  In general, opening the damper draws more air into the burner flame, making it cleaner.  This creates an oxidizing atmosphere in the chamber.  Closing the damper decreases the amount of air to the burner flame, creating a dirty flame (unburned fuel) resulting in a reducing atmosphere in the kiln.

The damper can offset what you are doing with the burners, so gaining some knowledge of its function is important.  For our purposes we will keep things simple.  In the early part of the firing keep the damper open as much as possible.  This will keep the chamber oxidizing (clean- little or no unburned fuel).  Close the damper some (to a set position) when you are ready to start reduction.

Reduction should begin between ∆ 010 and 06.  I have read articles that say you can reduce as late as 2100˚f.  Shinos require an early reduction to get carbon trap.  We are looking for a good body reduction to set up the glaze color from the vaporization of the salt. It is called reduction, or a "reducing atmosphere," for what the free carbon or carbon monoxide (from unburned fuel) does to the clay and glazes.   Clay (everything, really) contains some amount of iron.  Iron in its oxide state- what we put in glazes and what is found naturally occurring in clay is written Fe2O3.   Free carbon or carbon monoxide is unstable at high kiln temperatures.  It wants to attach to an oxygen molecule(s) to become C02.  There are two sources.  One is the air around the kiln.  The other is the oxygen molecule found in the iron oxide contained in the clay or glaze.  It robs an oxygen molecule from the iron or other metal oxides and thus "reduces" the iron from an oxide (Fe2O3) to a metal (FeO) on its way to becoming C02.

Reduced iron is a grey (metallic) color.  Break a pot that has been fired in reduction.  You will see a dark cross section.   The pot shard will have a brown surface, however.  This is from re-oxidation of the iron in the pot's surface. As soon as the kiln is shut off, air rushes into the chamber and creates an oxidizing atmosphere.

Damper in to create enough back pressure that you get some flames at the front upper spy holes, about 6 -8 inches.  This tells you that the chamber is reducing.  Continue to fire the kiln with some flame showing for the rest of the firing.  We will adjust things a bit later.

The kiln chamber is constantly changing.  As the kiln heats up pressure builds.  This can change the visual cues.  The reads may change so be ready to make adjustments at any time.  Keep the kiln ramping while getting the same flame at the spy ports.  Continue until ∆8.

Tuesday, January 12, 2010

Basics of Firing a Salt Kiln

Firing any fossil fuel kiln can be broken down in a few different ways.  We will organize it as startup, ramping/atmosphere control and firing off- roughly beginning, middle and end.

Starting a kiln: lighting burners-

Before lighting any kiln make sure all the burner valves are off.  We have a separate main valve gate so this is especially important when we first open the main.  The burners (natural gas in our case) are nothing more than carburators.  They mix air with gas. Our burners are homemade "alfred" type, using basic pipe fittings.   I will post images soon.  You can find the design in books on kiln construction. They have a small chamber containing an orifice for the gas and a primary air port, or gate,  to let air in to mix with the fuel. We also have used manufactured venturi type burners which operate in the same way.  They are easy to find and operate.

To light the burner, use a small propane bunsen torch as a pilot. (Use the appropriate safety gear.  I will assume this through out these posts.  There is plenty of information about safety in books and magazines.)  Make sure the primary air is closed tightly.  Light the torch and place its flame in front of burner you are going to light. Slowly open the burner gas valve until a small amount of gas is released.  We call this cracking the burner.  When the burner ignites the flame should be lazy and yellow.  Leave the flame this way for around ten minutes or so. This will warm the burner, making it safer to introduce air to the flame.

After ten minutes, usually less in the summer, the burner can be adjusted. Give it more air to get a hotter, cleaner flame.  This is done by slowly opening the primary air port.  Give the burner enough air to turn the flame blue.  You may see some yellow at the tip.  This is fine.  You want an "oxidizing" flame.  This is a clean burning flame that has sufficient air to burn all or most of the gas.  Do not give the flame too much air.  This will result in the flame being cooled by it own air supply.  It can also result in "coughing" or back burn where the flame recedes into the burner chamber.  You will hear it.  The burner will also get very hot so be careful. Shut the burner down for a minute and start over.  Repeat this process until all the burners are on. The timing for lighting burners depends on the pots in the kiln.  If you are firing greenware the kiln should be fired slowly.  We fire bisque, so lighting all the burners (4) can be done in a shorter time.

Please note that I refer to sensory cues. You will not learn to fire a kiln (or troubleshoot) by being given numbers, or inches, or the like. I will give some quantitative reads at times for sure.  But all kilns (and burners) are different so a good general knowledge the process is key.

Once all the burners are going with a nice lazy blue flame, you can relax for a bit, have a bite or a cup of coffee before ramping the kiln.

Our firing schedule is roughly this-

8:00 or 9:00 am- start the first burner.
By 9:00 or 10:00 am- all burners on.  Start ramping.
Ramp kiln to ∆ 010 - ∆ 08 (1650˚f -1750˚f, roughly). Start reduction*
Ramp and reduce until ∆ 8.  Start salting.
Soak and salt until ∆ 9 is down, which is ∆ 10 pointing at nine o'clock.
Shut off all burners, and crash cool to a bright orange kiln chamber.

Usually this takes 10 to 12 hours, sometimes a bit longer.  We try to salt after dusk so the vapor is not as noticeable.  If passers by call the UFD, they have to come.  We always call them before salting to give them a heads up.

* There are two schools of thought on reduction.  Some potters do a "body" reduction at this temperature (for a given amount of time) and then ramp in a "neutral" atmosphere until doing a "glaze" reduction at ∆ 8,or 9.  We favor ramping in a reduction atmosphere. There are pros and cons about this in terms of being green and "wasting fuel." We try to strike a middle position.  The kiln results are the priority. A bad firing is neither green or efficient.

Next: Ramp and Reduction


Sunday, January 10, 2010

Firing the PrattMWP salt kiln- some notes...


Our salt kiln is built mostly out of k23 and k26 insulating fire brick.  Although this type of brick is susceptible to faster deterioration,  coatings or not, we feel that the time and fuel savings are enough to warrant using them.  From a teaching standpoint, the ability to fire our kilns using a shorter schedule is especially helpful in a continuing education setting.  Our students do not always have the time to tend a kiln for 24 hours.  There is no need for this anyway.  A good firing schedule does not have to be long- just set up for a safe and and successful outcome.  A good steady ramp and knowledge of some basic elements that impact ceramic materials are needed.  


Over the next few posts we will discuss heat gain or ramping and controlling of the kiln atmosphere.  These are easy to describe but nothing improves firing skills more than experience, trial and error. Learn to read the kiln.  Take good notes.   Pay close attention to cause and effects.  Lectures or written instructions are a good start but never a substitute for doing and seeing.  You fire with the senses!  All the pyrometers and Co2 analyzers will not take the place of using your eyes, ears and nose.  Weather is often questioned as a factor.  It is to some extent.  Barometric pressure can have its effects.  Outside temperature is of no consequence.  For this discussion, we will assume the kiln is protected from the most problematic of weather conditions, the wind.  


We fire our salt kiln with natural gas. Some other time we can get into the differences between fuels.  Most potters use natural gas, propane or wood.  Oil is still used, but it seems rare.  Still, the basic ideas we will talk about are the same regardless of fuel.    


One last thing-  your head should be inside the kiln!  Some of the reads are "external" but they are symptoms of the atmosphere in the chamber, surrounding the pots.  And the reads will be different from kiln to kiln.  They can also be different from firing to firing.  Good notes and kiln logs will help in seeing  the nuances and effects of loading patterns and kiln designs.  This stuff is amazing.  How nature applies its laws to the firing and how materials react to heat, oxygen and carbon, we might take for granted.  Over the years one can lose the mystical sense of any firing.  But it is sheer poetry (in motion!).  It isn't the outcome.  It is the input.  Good craic(!) as they say in Ireland.


Saturday, January 2, 2010

Firing the PrattMWP salt kiln

Loading the salt kiln


Previously, we talked about prepping the salt kiln for firing.  This involves cleaning any debris from the last firing and getting the kiln furniture ready.  Wash the shelves and make sure the posts are in condition to make it through another firing.


Loading the kiln is relatively simple.  It is a bit more time consuming. The pots must be set so they will not need excessive clean-up after the firing.  Since the shelves are coated with a wash (see earlier post) that will be unaffected by vapor, the pots can be place directly on the washed and dusted shelves.  But as an added precaution, we place a clay and alumina wadding directly on the foot of the pots.  There are many recipes for wadding out there.  Some inexplicably call for the addition of flour.  I think it is added as a binder.  All it does is cause the remaining wadding to go sour and stink.  No need for that.  Follow any of the recipes you might find.  Leave out the flour and you will be fine.  Ours is simple.  Kaolin, Alumina, grog and sometimes pyrophylite.  We use something close to equal parts by weight EPK and alumina (hydrate or oxide) with enough grog and water to make it stiff but workable. Add some pyrophylite if on hand.


We make marble sized balls of wadding, dip one side in a water based wax resist and stick that side on to the bottom of the (bisqued) pots.  On occasion, we brush the bottom of some pieces with a wax resist that has alumina mixed in.  But this approach is more for porcelain than stoneware.

The pots are wadded as we load.  Pots should be stacked a bit more loosely than a reduction or electric firing.  Leave enough space for the vapor to flow around the pieces.  With experience you get to know what part of the kiln gets more vapor and load accordingly.  Loading does alter the flow of flame and vapor through the kiln.  Shelf placement has a greater affect.  Most kilns have at least two banks of shelving.  Make sure the shelf heights in banks are staggered as much as possible.   You don't want to create heat zones or sinks.  Remember that the vapor is in the kiln chamber for a very short time.  It is simple fluid dynamics- baffle and flow.  Keep the vapor moving inside the chamber as long as possible.  Adjust the bag wall if necessary.  For example, adding height to the fire wall may push heat to the crown.  Think of fluids moving through the  kiln and around the  pots.  But this is a bit more involved than we will get into now.  More on that in another post.

Our kiln is a downdraft.  The fire boxes are on both sides with the salting ports directly over head in the front wall about midway up the kiln.  The ports are high enough that the salt will have a distance to fall and vaporize (few feet), but not too high for placing the salt in the kiln.  We use a five foot piece of inch and a half angle iron as a trough that we slide into the port, parallel to the side wall of the chamber, and rotate, dumping the salt over the firebox.  But, again, I am getting ahead of myself here! More on this later.

Place cone packs throughout the kiln.  We use ∆ 8,9, and 10.   Use more cones if you want to see heat gain or need a marker for knowing when to start reduction.  You can never have too many cones.  Our kilns have more spy ports than you might see in other designs.  In addition to the usual ports in the door (3), we have two in each side wall.  You need to be able to see what is going on in the kiln!  Some potters believe that the vapor affects the cones end point.  I am not convinced that this is true in any measurable, significant way.  So we don't protect the cones.  The cones and the test rings are the only tools that give an accurate sense of heat work.

Place draw rings in front of the cone packs at each front spy ports.  Both cone packs and rings should be in far enough to get a good read on the chamber temperature and vapor gain, yet still visible with the rings within easy reach of of the draw rod.  Make sure the rings are sized to fit through the ports.  Remember they will shrink some in the firing.

We brick up the door with straight (high duty, fire) bricks all laid up in a bonding course, or short side facing into the chamber.  I learned this from Peter Sohngen some years back.  Only one end gets glazed.  I am not sure which is a better door, one of bonding courses or a door of stretcher courses (which still need a bonding course every 5 rows or so).  In either case, you will have to replace bricks often enough.  I am planning to experiment with a door design that would use straights tapered ends in a bonding course door.  We will let you know how that goes.

Make sure the cone packs and test rings can be seen at the ports.  Leave a few bricks out at the top of the door for early draw when you start the burners.We usually place an offering of sake (or schnapps or whatever is on hand!) and rice in bowls on the kiln top and start the firing.  In the next post of this series we will talk about starting the firing, the optimal firing schedule, controlling the ramp and atmosphere, and salting the kiln.  Happy New Year to all!